Wednesday, July 31, 2013

Maybelline Eye Studio Lasting Drama Gel Liner | Review


If I could give you one piece of advice, it would be that if you are not one to wear gel eyeliner on a daily/regular basis or are a beginner then do not go out and buy an expensive one. I, myself did in the beginning and it was the biggest waste of money I have ever spent!!

M.A.C 'Fluidline' was the first gel liner I bought and don't get me wrong it was lovely, really pigmented and lasted all day on but I found it dried up quite quickly when I wasn't using it and I had to dump after 3 or 4 months - absolutely disgusted after paying about €19 for it..


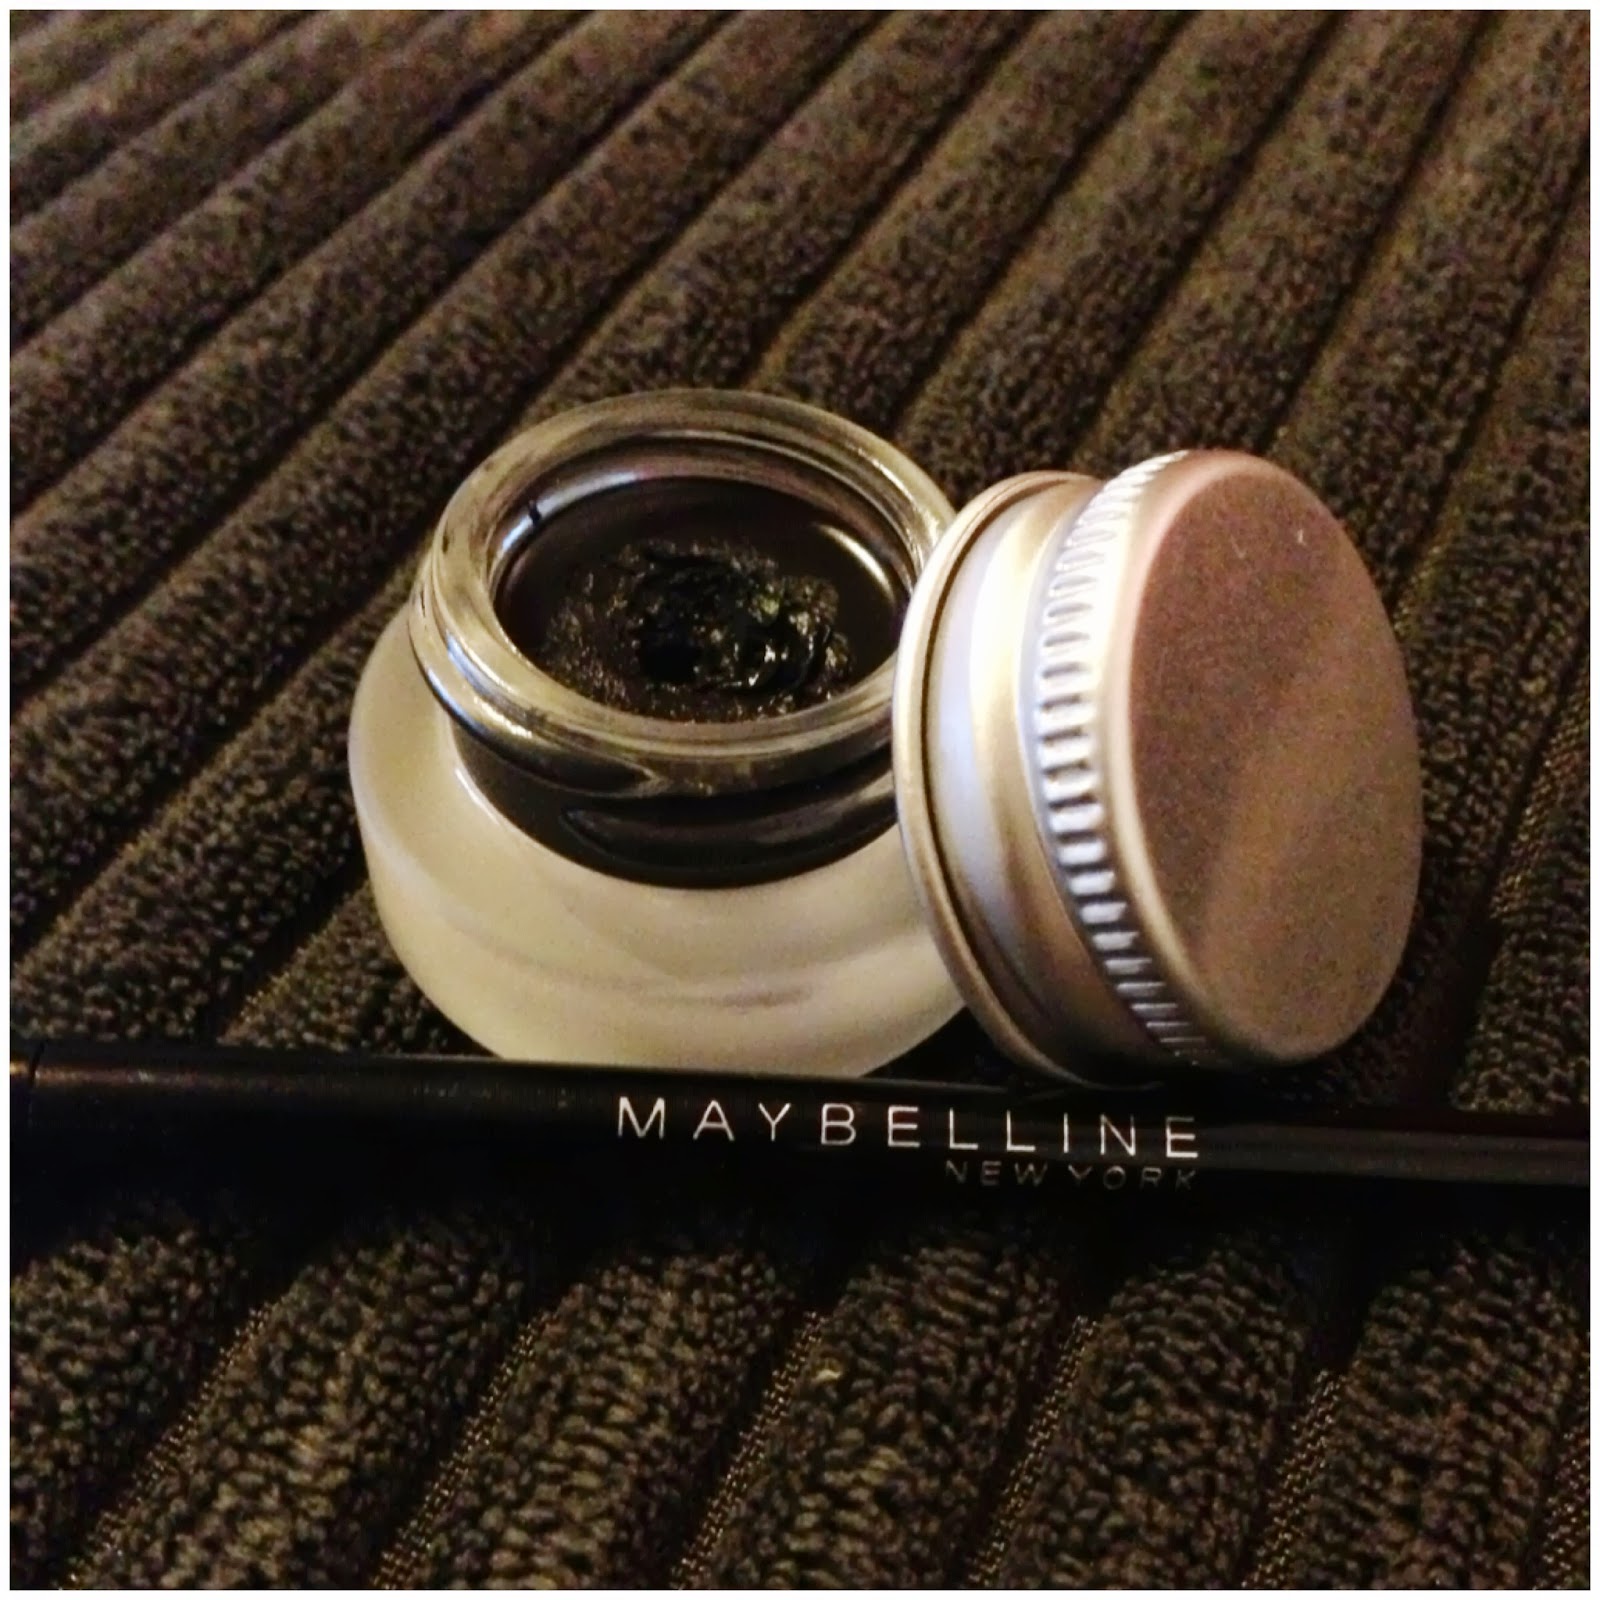
Maybelline's gel eyeliner on the other hand is fabulous, I've had it about six or seven weeks now and I find myself picking it over my kohl pencil time and time again. It is like silk in texture and is as pigmented as the MAC liner without the price tag. It is blendable making it a great base for a smokey eye and once it is set will not smudge or smear during the day. It is safe to use on the water line and lasts as long as any waterproof liner.
You get a brush with the pot of gel which is great, although it is a bit big for my liking. I personally prefer to use my Sigma E05 brush simply because of the pointed tip, I find it gives a more precise line and over all it is easier to use especially for amateurs like myself.

It comes in four shades but being honest, I have yet to find anything but '01 Intense Black'. Which is a shame because I'd love, love, LOVE it in brown too.. And if this is the one and only fault I have, then I really have nothing to complain about. It is available in Boots stores nationwide for €11.99 or if you're cute like me, you'll wait for one of their 3 for 2 offers!!


Now to get practicing some of these amazing looks..

Wednesday, July 24, 2013

Brisa Lite by CND | My experience - First Treament


As I have previously mentioned I am both an ex gel nail wearer and a long time nail biter (since about the age of six or seven). So this blog is something I have been very excited to share with you all. As of July 13th 2013, I said goodbye to gel nail extensions and nail biting forever.. Hopefully! This was the day I started my 'Brisa Lite' treatment.

 I have been literally bursting to blog about it but I held off as I wanted to really put it through its paces! And trust me, I did! For those of you who aren't familiar with Brisa or haven't seen me mention it previously, I give a quick run down of what is involved in a previous blogpost.

Here is an example of just how weak my nails were before I started this treatment - Like if you cried (Sorry I couldn't help myself).

I was warned before starting the 'Brisa Lite' treatment that it is not for the faint-hearted and I had to be dedicated, if I was going to jump in and out of it then I was only wasting my own time and money. My appointments are about ten days apart but can vary, anything from seven to about fifteen days depending on what your nails require. The "Brisa Lite" course does not include colour but you can have anything you desire applied over it or just use a wet polish. I'm quite lazy and just down right useless when it comes to painting my own nails so I decided to have 'Gelish' applied on top of the Brisa, not only do they look gorgeous but I feel like it's an incentive. Who doesn't want pretty nails? Now there is a small bit of maintenance required on your part, including applying a daily application of a top coat and regularly using cuticle oil - it's really not that hard!


'Gelish' application in the shade "Radiance is my middle name"

I had my second visit yesterday and have to say I was massively impressed with my results. I am a bit of a klutz and tend to bang my nails off of things quite often, I have spent the last few days almost afraid to look at my nails after banging them but can't help but smile when I do. I did NOT break one nail in the first ten days and didn't have one chip which really impressed me as I am on a computer, tapping away all day in work and I come home and begin the tapping all over again! 

However, I'm pretty sure Olive, "my" nail tech (I say my in inverted comma's because unfortunately, she does not actually belong to me) was probably more surprised than I was with the condition of my nails, if it wasn't for my growth I could have probably gotten a few extra days out of them! My growth has been brilliant and when the 'Brisa' was removed I could already feel a difference, after one treatment my nails feel sturdier. I am still in shock. The prospect of having strong natural nails is something I thought I could only dream about after everything I have put them through over the years!


2nd application of Brisa with 'Gelish' in the shade "I'm brighter than you"

I'll be giving a full run down on the application/ treatment in a separate post in the next day or two but in the mean time just remember..


A massive thanks goes out to Olive from PiggysPinkiesWestCork for this introducing me to "Brisa Lite" and for the opportunity to share it with you all! Photos are by the very talented Niall of Niall O'Sullivan Photography. I really appreciate all the hard work!


Monday, July 22, 2013

Budget Beauty - DIY Body Scrub | How To

As we all know it's really nice to get a gift set full of lotions and potions and they make it so tempting to go out and repurchase some if not all of the stuff inside of them. I myself am guilty of this but these products can be so expensive!! The scrubs are probably my favorite treat in these sets as we all LOVE to have silky smooth skin and don't get me wrong the majority of them smell divine and do what they say they're going to do, But are they really worth the repurchase price?

Soap and Glory for example!? A "full size" (300mls) retails for about €12.00... Not that bad? Maybe not.. But as good as these scrubs may or may not be - I always find myself going back to my good ole reliable home made body scrub and it never fails to impress me!

It literally takes minutes and is so cheap to make!


What you need: 

  • A bag of sugar (anything but caster sugar as you want it to be grainy)
  • Baby oil or alternatively coconut oil depending on your preference
  • Shower gel (whichever one you like)
  • a spoon
  • a container to mix and store it in afterwards


How To: You take one part shower gel (I always use a lemon scented shower gel as its a really refreshing scent, especially if you're scrubbing off fake tan from the night before) to two parts oil (again baby oil or coconut oil) and mix them together in the container. Then you add in your sugar in until it becomes a thick, "gloopy" consistency. The more sugar you add the grainier it becomes.


It's as simple as that! 


Why it worksI ALWAYS use this scrub when I'm prepping my skin to apply fake tan. You have your shower the night before and get all your shampooing and shaving out of the way. Then taking an exfoliating mitt, liberally apply it and scrub! The oil helps to break down the particles of any old tan. This gives you a fresh canvas to work with and means you won't have any build up or patchiness. It also saves time as the oil is so moisturizing that using a body lotion afterwards is completely optional.

 My TOP TIP for using the scrub is to work in circular motions. DO NOT be rough with it as this will not make your skin any softer, it will only make it red and irritated. Instead, move the mitt along the skin faster and you will be left with super soft skin that has a radiant glow. 

And last but by no means least - Don't forget to give the shower a rinse when your done as you don't want the next person in the shower to hurt themselves. Do you?

Saturday, July 20, 2013

Be Sun smart | Rant

So this is probably a very "ranty" blogpost for a Saturday evening but I promise you girls in years to come you will thank me for it! 
We all know that men get better with age - take George Clooney for example. He's 52 and you wouldn't kick him out of bed for eating Tayto! But is the same true for us women? It could be, if you take care of your skin that is..

Lately, I've been hearing a lot of "Oh Rebecca, you look very pale!" and it inspired me to write this post. Yes, I am quite pale naturally, it doesn't help that I'm anemic but you'd think with the weather we are having here in Ireland that I'd surely be after getting a bit of a colour, right?

Right! Yes I have gotten a bit of a colour on my arms, legs etc. My face on the other hand I have very little colour on and YES it is intentional. I DO NOT TAN MY FACE!! 

Why? It is very simple, some of the woman in my family (my grandmother, mother and aunts) suffer from a little thing called 'skin hyper-pigmentation'.

 What is it? Basically it means that the skin produces an excess of melanin due to damage from harmful UV rays, leaving you with dark patches on the skin! Although it is not always visible straight away, it will inevitably rear its ugly head if you do not protect yourself.

 See the image below: An excellent example of the effects of sun damage on your skin!


Now, I am by no means telling you to sit inside depressed looking out at the glorious weather, that would be plain mean. What I am telling you is - Be smart!

You have heard it all before..

Wear sunscreen - I wear a min of factor 30 on my face when the weather is good and wear a moisturizer with a factor 20 built in all year round, you might that I'm getting ahead of myself, living in Ireland and all but I am telling you, you can never be too careful! UV rays are sneaky and are lurking around even on the dullest of days.

Avoid the sun when it is at it's hottest - Between the hours of 11am and 3pm the sun is highest in the sky, this is the hottest time of the day and when you're risk of skin damage is at its peak. So although it may seem like a good time to work on your tan, you are actually just helping the wrinkles along. 

Have you ever noticed that gradual fake tans always look better than instant ones? The same applies for a natural tan. It is a lot easier and a lot more comfortable for you to build your tan up gradually, being burnt alive is not nice, nor is it very attractive! 

And last but not least.. What do you think bronzer is for? Bronzer is for the sun smart! You can still have a healthy glow without any of the sun damage with the aid of your favorite bronzer, my budget fav is H&M's own brand bronzer (€5.95 for a compact that will last an absolute age).

Rant over! 


P.s: My first blog on my "Brisa Lite" treatment is to come, I want to get a good feel for it before I start ranting and raving to you guys ;)

Tuesday, July 16, 2013

Maybelline Colour Tattoo 24HR | Review


As you all may have noticed from previous blog posts etc. I'm big into eye makeup and nothing beats the classic smokey eye. Whether its a bold black or an eye popping purple you really cannot go wrong! Now creating these looks can take time and effort and that's fine if you have plenty of it.. But what if you don't?

Well I may just have found the product for you.. It comes in the form of the Maybelline Color Tattoo 24HR cream gel eyeshadows. They come in 12 different shades and are widely available around Ireland. I picked mine up in boots when they were doing a 3 for 2 offer (€7.49 each).
The pots are jammed full of product and will last absolutely ages. 


Now I must admit I was a bit skeptical about trying these as I was never one for gel eye shadows as I always found that they would crease throughout the day. This is not the case with these babies, they are heavy duty, long wearing eyeshadows. 'Tattoo' being the optimum name for them as they literally will not budge!!

They can be applied sheer for a light daytime look or you can build them for an intense nighttime look! Because of their a creamy consistency, they are really blend-able and make brilliant eyeshadow primers. They can be applied with your fingers (working the colour from the inner corner out) or using a brush ( I wouldn't recommend using one of your best eye shadow brushes though as like I said they are heavy duty).

Like I said I picked up 3 shades, all shimmery!


'Eternal Gold' - a glistening gold colour, the least pigmented of the 3 but I bought it to use as a base for with my Naked2 palette and it works like an absolute treat!

'Pink Gold' - a Rosey Gold colour that is bang on trend at the moment. I'm a big fan of it myself, someone give me a Korsy!  Add a little brown shadow to the outer corner of your eye and you have a really unique smokey look that will take you from day to night!

'On and On Bronze' - My favorite of the 3, is a beautiful bronze that needs nothing but a sweep of mascara and you're good to go! I have blue/green eyes and it just makes them look almost turquoise in the daylight and hey? Who doesn't want to look like a bronzed goddess in this weather? I will get so much use out of this one as bronze is my fall back colour and I wear it from one end of the year to the next!

I hope this helps and if you've used any of the Color Tattoo's I'd LOVE to hear how you use them!? Would you recommend any of the other shades?

You can now follow me on Bloglovin'

Saturday, July 13, 2013

Barry M Hi-Shine Gelly Nail Paint | Review

Hope you're all having a fab weekend! I'm back again today with a mini review for you. So during the week I started getting an urge to bite my nails and I always find painting them helps to curb that. So I decided to give the Barry M Hi-Shine Gelly Nail Paint a go! 
The colour I used was a bright almost to the point of almost luminous Orange in the Shade 'Mango 322'. I got it as a pick me up for having to remove my Gelish while in hospital and I have to say it was a very similar shade to the one I had on ('Tiki Tiki Laranga' by Gelish).


Down to the Nitty Gritty..

The Polish itself was extremely thick and to be totally honest kinda goopy! Something that you have to work really quickly with so you don't end up with a big mess.. In saying that, it does dry really fast which a plus if you're rushing ( i.e if you've completely forgotten to paint your nails before a night out). It is quite an opaque polish so 2 coats and you're good to go! As for durability? Because I was getting my nails done today I didn't bother with a top coat and it really doesn't need one. It says it is "Hi-Shine" and they really weren't lying.. the shine is phenomenal! I had it on for 2 days and I'm on a computer all day in work, it didn't chip in the slightest!! 

The only downfall? The one and only fault I could find with this polish was actually trying to get it off this morning. It was an absolute nightmare!! I used the supervalu own brand nail varnish remover (which contains acetone) and I literally soaked the cotton pad in it.. I took me about 15-20 minutes to get it off and when I say off, there were still little spots of colour around my cuticles that wouldn't budge. 

All in all? For the price (€5.99 in boots) I'd definitely give them another go.. I mean I have tried a few high end polishes which would not get a look in on the durability side of things and the colour pay off is brilliant. The range of colours in the collection is filled with some of the hottest colours for the summer months including; 'Dragonfruit' which is a pink/coral and 'Greenberry' a Tiffany Blue colour or for the less daring.. 'Lychee' a gorgeous nude. I'll be heading back to boots shortly to pick these 3 up.. While we have the weather ;)

Have you tried any Barry M nail paints before? What do you think of them?

P.S: As some of you may know from either Facebook or from my previous blog post.. I started my 'Brisa Lite' treatment today. Make sure to stay tuned if you're interested in trying it as I'll be doing regular blog posts and updates on my progress throughout the course of my treatment.

Saturday, July 6, 2013

Me Me Me Cosemetics | Review

Me Me Me Cosemetics have been around for a while but have only really become available in Ireland in the past few months. I, myself only discovered the brand in May on one of my many splurges in the chemist - I just can't seem to help myself and I must say I haven't looked back since. Their products are gorgeous! They have a brilliant range of colours and they really hold their own when you compare them to the 'high end' versions of their products!


I purchased 3 of their products and have my eye on a few more.. Namely the 'Beat the Blues' highlighter which an almost identical dupe for Benefit's 'High Beam' at under half the price!!


Shimmer Stack in 'Bronze' (€12.50): When I saw this I immediately thought of the Bobbi Brown Shimmer Brick so I couldn't leave it after me for that price! It is such a versatile product, a fabulous highlighter, a shimmery bronzer or use the colours individually as eyeshadows.  It isn't cakey and gives your complexion a healthy glow that will last all day. Simply apply this powder where the sunlight would naturally hit, just remember not to over do it.. You don't want to end up looking like a disco ball! At almost €30 cheaper than the "real deal" you really can't go wrong with this product - the perfect investment for the summer! 


Flawless Concealer ( €10.50):  There is nothing like a spot or the dreaded dark circles to ruin your day and I have tried and tested my fair share of concealers, in recent years favoring the Collection ( formally known as Collection 2000) lasting perfection concealer - a cult product! However, since the name change I find it can be very hit and miss.. So I continued on my search and found this! Although they start off with a similar consistency the end results are completely different. It is creamy yet light weight and will hide a multitude; spots, dark circles, broken capillaries.. You name it, this product is incredible! 

Arch Angel (€10.50): As we all know, Big HD brows are back with a bang. They aren't they easiest thing to master and you can end up with one perfect brow and one that looks like it's been filled in with a sharpie. Arch Angel is my favorite product in the collection to date as it really takes the fear out of doing your brows - it is perfect for beginners. It is a double ended wand, one end is a "one colour suits all" brown gel - HOWEVER, if you have extremely fair eyebrows I would not recommend it for you. This gel fills in your brow, shapes and tames all in one stroke. The other end is a creamy, pearlescent highlighter, when applied to your brow bone it gives you an instant lift, opening up your eye, making you look more alive. Again this highlighter is very versatile and can be used all over, along your cheekbones, down the centre of your nose, your cupids bow. EVERYWHERE. I really cannot rave about this product enough and I will without a doubt be repurchasing it! 


Have you tried any of the Me Me Me cosmetics range? Whats your fav product? 


Tuesday, July 2, 2013

I'm back..

Hi Everyone,

Just a quick post to let you all know that I'm back blogging this week and just to say thanks to everyone for sticking with me! Unfortunately I had an unexpected trip to hospital but I'm back to more or less full health now and have lots of exciting products to share with you all! 

I also have an exciting project coming up with 2 fabulous friends of mine! I'll be starting a new nail treatment called "Brisa Lite". Olive of Piggys Pinkies West Cork has taken it upon herself for her sins to treat my nails to some much needed TLC. I am both an ex gel nail enthusiast and nail biter and my nails have gone to wreck and ruin as a result! 

In a nut shell,  "Brisa Lite" is like a primer for your nails, it smooths the surface of your natural nail and adds some much needed strength so weak and brittle nails. It is a clear gel applied to your nails and then cured under a light. It can be worn on its own like a clear polish, you can apply your own nail colours to it or have your shellac or gelish applied on top! I'll be starting my "Brisa Lite" experience on the 13th of July and I have to say I am beyond excited!

 Expect lots of blogs and updates on my progress. During the course of this exciting project I will also be working hand in hand with my incredible photographer friend  Niall O' Sullivan Photography. He will be capturing photo's of all the crazy colours I choose, hopefully it will give you some inspiration to try something a little bit crazy! So if you or any of your friends are trying to treat damaged/bitten nails make sure you stay tuned! 

Thanks again for all the support and remember your health is your wealth! Look after yourselves!  


Rebecca x

Ps: My New Look Competition ends this weekend so if you haven't entered yet make sure to get liking and sharing. Here is the link!
Blogger Template by pipdig